Хранилище Exchange и методы его восстановления
Хранилище Exchange и методы его восстановления


Exchange database file
When the default installation of the Exchange is performed, the database file is automatically created in this location:
C:\Program Files\Microsoft\Exchange Server\V15\Mailbox\<database_name>
In that location, when you open the file, you should see the following list of files:
- Mailbox Database 0242942819.edb ‘ это файл самой базы данных почтовых ящиков, которая содержит все сообщения. Случайное число ‘0242942819’ генерируется во время создания базы почтовых ящиков и используется для создания уникального имени в организации Exchange
- E00.log - это лог файл, используемый в настоящее время механизмом базы данных
- E00000003A.log, E00000003B.log, E00000003C.log’ ‘ это лог файлы, хранящиеся на диске, которые можно использовать для восстановления. Обратите внимание, что используется шестнадцатеричная система счисления
- E00.chk ‘ это файл контрольной точки, используемой для отслеживания отношений между лог файлами и файлом базы данных почтовых ящиков
- E00res00001.log and E00res00002.log ‘ это предварительно созданные лог файлы, используемые, когда диск, содержащий лог файлы, заполнен
- E00tmp.log ‘ новый лог файл, который создается в текущий момент
Все имена лог файлов в этом примере начинаются с трех символов, E00, называемых префиксом. Этот префикс будет использоваться для лог файлов данной конкретной базы данных. Вторая база данных будет использовать префикс E01, третья – E02, и т.д.’
Below you can see the screenshot that depicts already mentioned files.
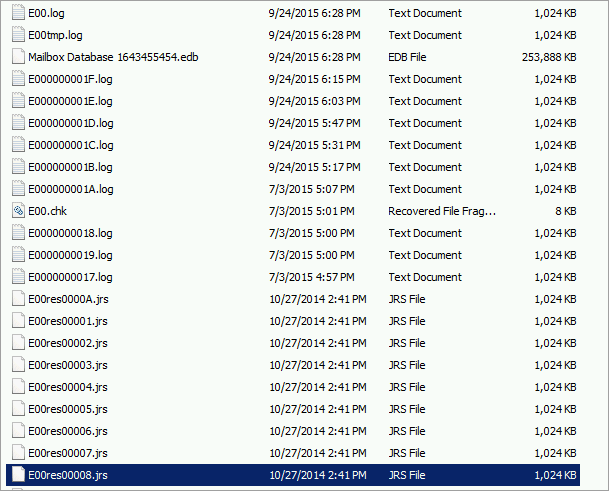
All the information processed by the Exchange server is automatically recorded onto the E00.log file. If this file goes over 1024 KB in size then another file is created – the new file is named according to this pattern: <original name> <hexadecimal number>. For instance, let’s assume that your E00.log file size reaches almost 1024 KB. When it happens, the E00tmp.log file is created and the content from E00.log goes to the file named: E000000001.log. If the E00.log is about to exceed its size again another file is created, named E000000002.log, and so on. In Exchange, those sequence numbers are named IGeneration.
Thanks to this database mechanism, you are able to retrieve all data even in case of physical server damage, providing the hard disks have remained untouched. In most cases, thanks to the log files, the Exchange itself (after the reboot) is able to get back to the state from before the failure. Of course, some rare situations may arise in which the server is not able to retrieve the previous state and the admin’s help is required.
The ESEUTIL tool
In Exchange 2013/2016, this tool is located in:
C:\Program Files\Microsoft\Exchange Server\V15\Bin
When it comes to other Exchange server versions, the path will look similar. When it comes to its functionality, the ESEUTIL tool has a range of helpful switches. They will help you:
- ESEUTIL /D ‘ используется для автономной дефрагментации базы данных
- ESEUTIL /R ‘ используется для восстановления базы данных
- ESEUTIL /g ‘ выполняет проверку базы данных на целостность
- ESEUTIL /k ‘ выполняет проверку контрольной суммы базы данных
- ESEUTIL /p ‘ исправляет базу данных, когда она повреждена (и не подлежит восстановлению)
- ESEUTIL /m ‘ может выгружать информацию заголовка базы данных и лог файлов
- ESEUTIL /y ‘ может копировать большие файлы типа Mailbox Database
- ESEUTIL /c ‘ используется для ‘жесткого восстановления (hard recover)’ базы данных во время резервного копирования в режиме онлайн
Defragmentation of the database with ESEUTIL
Important! Before you start working on your database with the ESEUTIL tool, make sure that you have created a backup copy of database files as well as all log files.
Defragmentation is a process in which the database is reorganized in order to reduce its fragmentation level and create the database anew – in as much contiguous way as possible to improve its performance and reading speed.
Generally, in the newest Exchange server versions, defragmentation is not recommended and it helps only remove so-called “white space” – free spaces within the database which, in fact, will be filled in with data anyway. However, there are some scenarios where defragmentation can be used:
1. Lack of space for a new database – a database cannot be created as there is no free space
2. The free space on the disk with our database on is decreasing
In order to check how much free space is available in the database you can use the following cmdlet:
Get-MailboxDatabase -Status | ft name,databasesize,availablenewmailboxspace

In this case, you can see that the database holds 247.9 MB including 83.81 MB of free space. In order to regain those 83 MB, you need to use the ESEUTIL tool to perform the process of defragmentation.
The first step to start with is to dismount the database. You can achieve that with this cmdlet:
Dismount-Database –Identity <database_name>

It is important to remember that to defragment database you need free space as during this process a temporary database is created. You can use this formula to calculate it:
(DatabaseSize – AvailableNewMailboxSpace) x 1.1
For example:
(247.9 MB – 83.81 MB) x 1.1 = 180.5 MB
It means that we need 180.5 MB of free space to complete the task. This, however, may turn to be bothersome as you perhaps already lack of free space as you have decided to start the defragmentation process. Fortunately, you can use an UNC path to store the temporary file used in defragmentation. The effectiveness of the process is about 45 GB per hour so it is good to estimate how much time you will need to complete the process in your case.
Run the ESEUTIL tool and /d and /t switches – /t switch indicates the temporary path.
ESEUTIL /D <database_name> /T <UNC_path>
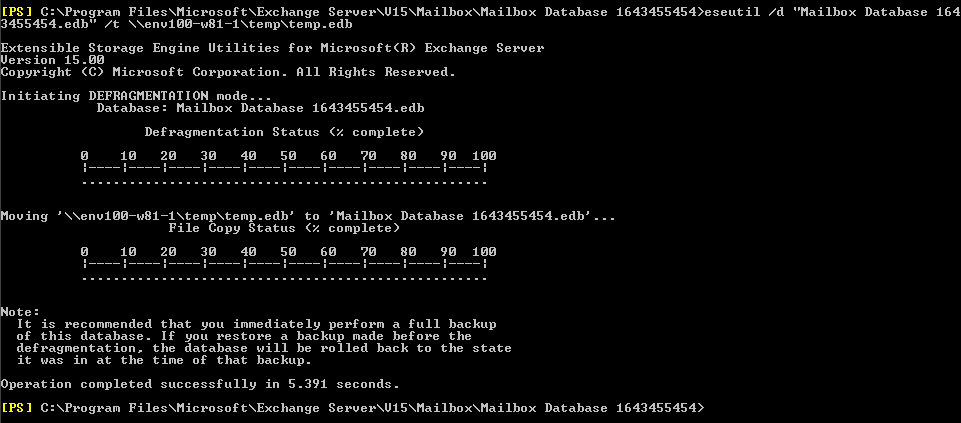
Now the database is ready to be mounted back.
Mount-Database –Identity <database_name>
![]()
Let’s check how much free space is taken up by the database now. To verify that you can use this cmdlet:
Get-MailboxDatabase -Status | ft name,databasesize,availablenewmailboxspace
After executing this commend you should see that the database takes up less space. You can also check the size of the .edb file.
Well, so the process of defragmentation is finished. Let’s now see into its steps again:
- A temporary database file is created and it is given a random name.
- ESEUTIL copies the data from the old database to the temporary one omitting free space.
- Once all data has been transferred to the new database, the old database is deleted.
- The temporary database name is changed to the original one – from before the defragmentation process.
After defrag is complete, you need to make sure you have created a full backup of database as it will not match the previous backup (the database has a new structure now). Defragmentation should not be performed on databases connected within DAG. If it is preformed, a new GUID of the database is created which means that the Exchange will see it as a completely new object. In such a case, the best way is to create a new database and migrate users’ mailboxes to it.
Use ESEUTIL to read headers
Each log file or the .edb file has a header which contains useful information from the Exchange server perspective. In order to view the database header using the ESEUTIL tool, you need to execute this cmdlet:
ESEUTIL /MH <database_name>
Important! The database needs to be in the offline mode (dismounted).
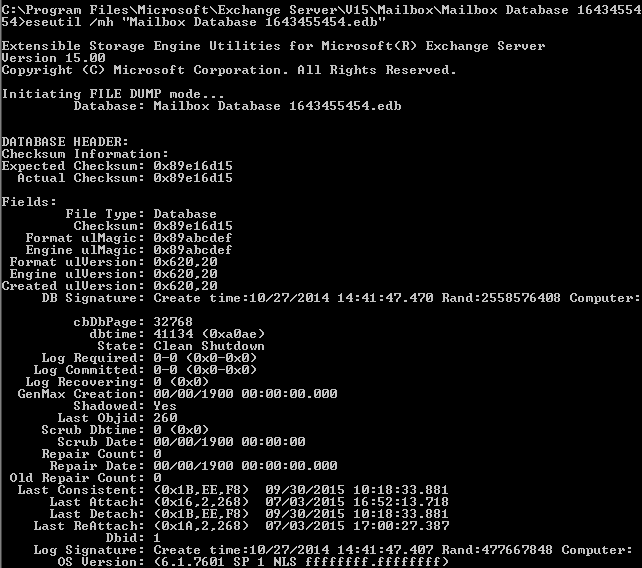
The result of this cmdlet is presented above. You can see that there is much information about the database. Despite the one pretty obvious such as the date of creation, you can also find important information about the state of the database file – in the screenshot above it is displayed as “Clean Shutdown”. This piece of information means that there is no incompatibility between the information in log file and the database.
Here you can also find the information on so-called DB Signatures which indicates the database signature already mentioned in the previous section of this article. In the screenshot above, it is displayed after the word Rand. Additional important information is carried by the Log Signature header which points to the last log signature. In the example above, the signature number is 477667848.
The header called Log Required tell us which log files are required to start the database. In our case, the value shows 0-0 which suggests that everything is fine and no file is required. However, in the case when the database had been stopped unexpectedly, this value could be, e.g. 34-37, which means that we need the following range of log files E000000034-37.log in order to start the database.
Now, let’s examine the headers of the remaining files. To do that, you can use the cmdlet below to see what is included in the main Exchange log file – E00.log.
ESEUTIL /ML E00.log
The result is presented below:
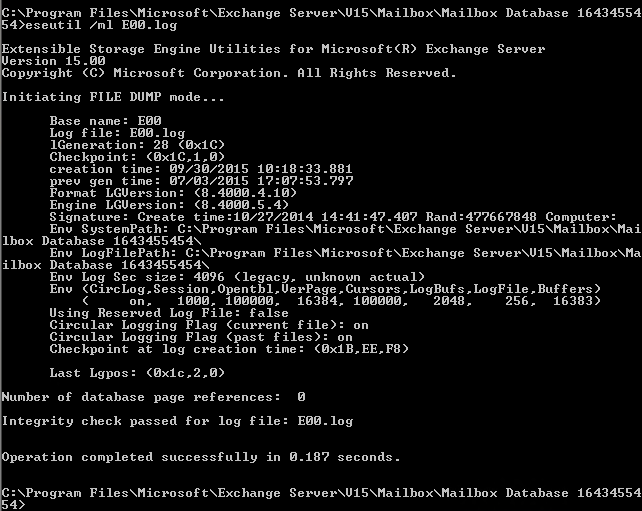
In the screenshot above, you can see lGeneration number, which represents a sequential log number to be used in the future – in the example above, it is E000000001C.log. You can also notice that next to the Signatures header, there is the following number displayed: 477667848 – the same that was found in the database file. This suggests that this log file belongs to the previous database.
In order to check the log sequence as well as their state, you can use this cmdlet:
ESEUTIL /ML E00
The result is presented in the screenshot below:
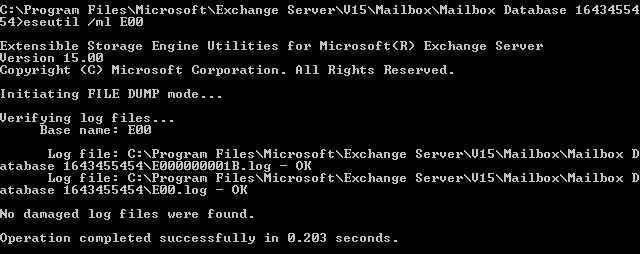
As you can see, the sequence consists of only two logs: E00.log and E000000001B.log. The additional information provided is that they do not generate any problems at this moment.
The last file that we can take a look at is the checkpoint file E00.chk. Run the cmdlet below to display results:
ESEUTIL /MK E00.chk
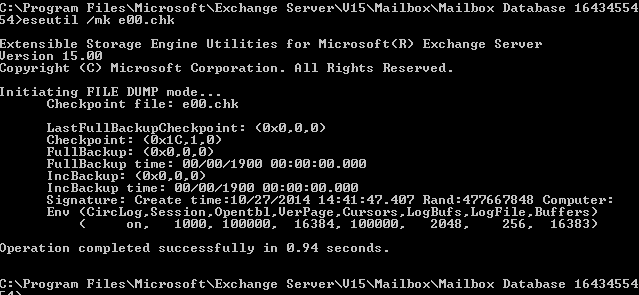
One of the important pieces of information that you can find here is the name of the last checkpoint – the file that has been already added to the database. In this case, it is 1C which refers to the file E00.log that will become a log file named E000000001C.log. Of course, what is always significant is the signature that point to the log file which corresponds with the E00.chk file.
Repair your Database with ESEUTIL
Important! Before you start working on your database with the ESEUTIL tool make sure that you have all files from the database catalogue backed up and safe.
As it was already mentioned, in some situations a so-called Dirty Shutdown may happen. When you see such a status displayed next to the State header, this suggests that some required log files are missing. The screenshot below shows the results of the ESEUTIL /MH <database_name> cmdlet:
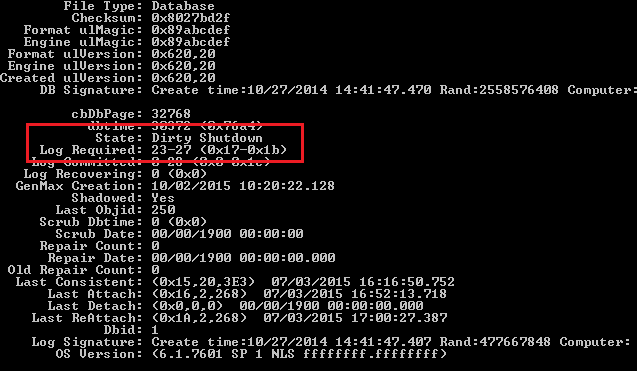
As you can see, the Dirty Shutdown state has been reported. In the next line, there is the Log Required header which informs about the necessary log files. According to the screenshot above, the missing log files are from 23 to 27 (in the hexadecimal format 23 stands for 17 and 27 stands for 1b so the missing log files are from E0000000017.log to E000000001B.log). Those logs are required to recover the database without data loss.
Soft Recovery using ESEUTIL
If you have the missing logs, the recovery process would be a piece of cake. The only thing you need to do is to execute this cmdlet:
ESEUTIL /r <log_prefix> /l <path_to_the_folder_with_log_files> /d <path_to_the_folder_with_the_database>
In our case, the cmdlet should contain the following information:
ESEUTIL /r E00 /l “C:\Program Files\Microsoft\Exchange Server\V15\Mailbox\Mailbox Database 1643455454” /d “C:\Program Files\Microsoft\Exchange Server\V15\Mailbox\Mailbox Database 1643455454”
After this cmdlet being executed, the missing logs will be restored to the database.
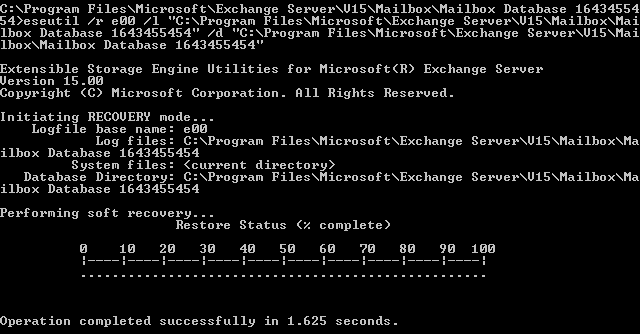
Now, it is good to check the state of our database one more time.
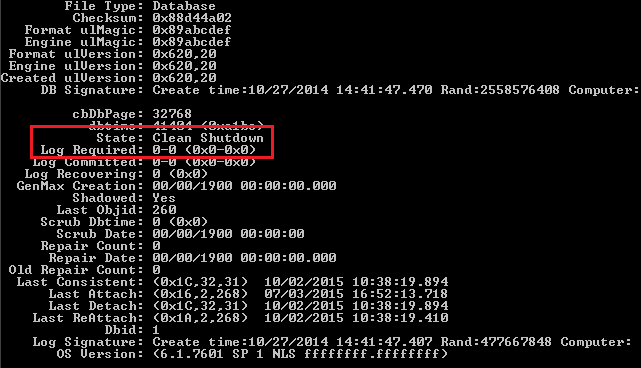
As you can see in the screenshot above, the state of the database is reported as Clean Shutdown so the database can be mounted now. Use this cmdlet to complete the task:
Mount-MailboxDatabase –identity <database_name>
Hard Recovery using Eseutil
It is strongly advised against using this type of database recovery as it may cause data loss and make it difficult to predict how much data may be lost. This the reason why the hard recovery should be used only as the last resort when there is no other alternative to recover the database.
The process of hard recovery consists of three stages:
- Database repair with ESEUTIL and the /P switch.
- Defragmentation of the database and its reconstruction with the /D switch.
- Index repair within the database with the IsInteg tool.
In order to start the procedure, you need to execute this cmdlet:
ESEUTL /P <path_to_the_database>
The result is presented below:
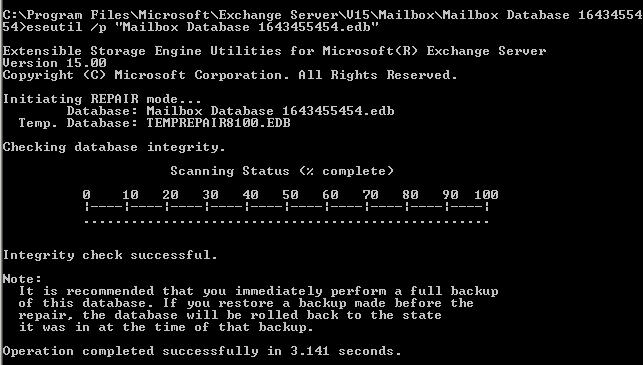
Then, you need to defragment the database – the instruction on how to perform defragmentation has been already discussed in this article.
The final stage is to use the IsInteg tool (not available since Exchange 2010 SP1 – replaced with New-MailboxRepairRequest). IsInteg, in comparison to ESEUTIL, repairs the database in a more sophisticated level, e.g. it repairs mailboxes or folders.
The path to this tool is as follows:
C:\Program Files\Microsoft\Exchange Server\Bin
In order to repair the database, you need to execute the following command:
Isinteg –s <server_name> -fix –test alltests
The result is below:
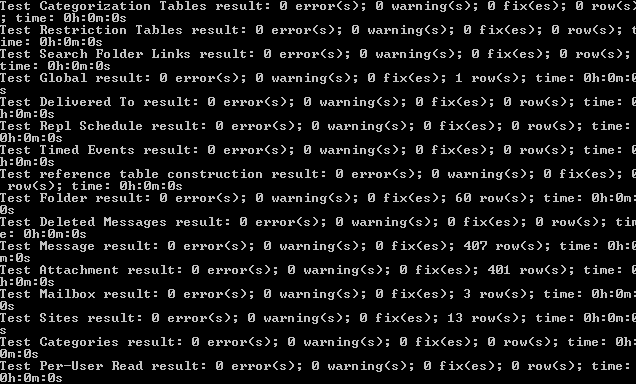
This command can be repeated as many times as it is necessary to get rid of all errors. Once the repair has been finished, you are ready to mount the database.
Summary
Despite the fact that ESEUTIL can be considered rather an aged tool, it still widely used among administrators working with the Exchange server. Nevertheless, its future seems to be rather gloomy as there are new generation solutions such as New-MailboxRepaiRequest replacing the Isinteg tool (since Exchange 2010 SP1).

